Caulking Drywall: Tips and Tricks
If you’ve got thin cracks in your drywall, you don’t necessarily have to break out the drywall compound to mud the area. Caulking drywall is a much faster and easier way to repair those hairline cracks.In fact, you can save time and money on your home renovation by caulking drywall corners in areas like closets, laundry rooms, and mudrooms. However, you should be aware of two things before you start caulking.
No matter what type of caulk you’re using, the caulked part will look off and the paint will be easily discolored. Secondly, caulk will not last unless the environment temperature is stable. If you are caulking in an area where the temperature is changing significantly, within a year or two you will have to recaulk it.
Now, discover our list of tips and tricks for caulking drywall in your home.
Buy Fresh Supplies for Caulking Drywall
If you’re tempted to grab an old tube of caulk that you’ve had for a while, don’t. Caulk becomes useless once it dries out, and chances are, that old tube is pretty dry. You need a fresh tube in order to get the best, smoothest results.
Select a Paintable Variety of Caulk
When you purchase the caulk, be sure that it’s the type you can paint over. Not all types of caulk hold paint well. Some DIY home renovation experts swear by paintable silicone caulk since it allows the paint to adhere smoothly.
Others claim that the silicone caulk cracks much faster, and they recommend high-quality acrylic latex caulk. Ultimately, your goals determine your choices in this case. Before you make a purchasing decision, you may want to read this article for a better comparison.
Check the Quality of the Drywall Crack Repair Caulk
When you’re caulking drywall, don’t skimp on quality to save money. Cheaper forms of the caulk might crack or fall out more quickly, or they may permit greater air leakage, which in turn will contribute to a general lack of airtightness in the home.
If you have too much leakage, the house won’t be as energy-efficient, and your property value could dip lower.
Another factor to consider is the safety quality of the caulk. Most caulks are flammable, which adds a risk factor to their use when you’re patching drywall. If possible, purchase fire-rated caulk that offers similar protection to standard fire-resistant drywall mud.
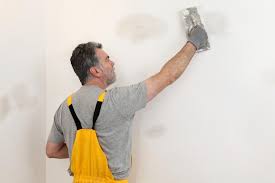
Apply the Caulk to the Drywall Cracks
Caulk usually comes with easy-to-use instructions printed on the tube. All you need to do is snip off the end and begin squeezing out the caulk. Test the substance first on a disposable surface so you can be sure it’s the right color and consistency; then apply it to the drywall crack.
You can use your finger to press the caulk into the crack and then smooth it out with a paddle or scraping tool. Before the caulk completely sets, give the wall a quick wipe-down to remove any excess or overflow.
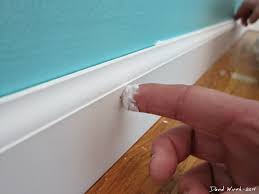
Drywall cracks are very common around windows and doors due to the added use and moisture in those areas. You can caulk along the edge of a door frame or window frame and use your finger to push the caulk along the crevice and smooth it out. Be sure to wash your hands after caulking drywall.
After the caulk sets and dries completely, you can touch up the caulked area with paint. Be sure that the color of the paint is precisely the same as that of the rest of the wall, or the newly caulked area will look odd.
Caulking Vs. Spackling
Because it’s so flexible and you can’t sand it, caulk isn’t the ideal material for filling holes. You should instead do that with a quick application of spackling compound, using a putty knife. Spackling compound is also the material to use to repair chips in wood — it’s stiffer than caulk yet pliable enough to mold, and you can shape it with sandpaper after it dries. Caulk is the material you need when you want to fill gaps around wood trim and molding or when you want to provide a weather-resistant seal around a door or window.
Application
Applying spackling compound is a straightforward procedure — scrape it on with a putty knife, wait for it to dry, then sand it flat — but the procedure for applying caulk is a bit more involved. Because caulk is designed to seal long gaps, you generally apply it in a continuous bead with a caulking gun in a two-step process. The first step is to apply the bead, and the second is to tool it by running your finger along it to create a convex surface. After that, you allow the caulk to dry. If it isn’t silicone, you can paint it.
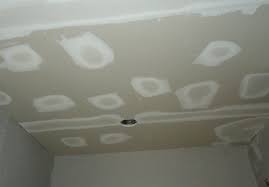
Patching Drywall
Simply drywall patching requires surface preparation, applying the drywall compound, and then sanding and finishing the wall surface. A quick trip to your local hardware store should provide you with all the materials and tools you need. You might even be able to get some extra tips on your specific drywall patching project. Small-to-medium sized holes and drywall cracks shouldn’t be too difficult, and if something does go wrong, you’re unlikely to make the situation much worse than when you started. Make sure you know how to repair a hole in the drywall to avoid more expensive repairs.
On the other hand, just like trying to touch up some chipped paint, if you don’t have extra paint you probably won’t get an exact match.
Patching Drywall Alternatives
One alternative to common drywall patching compound is paintable caulk. If, for some reason, you find your drywall cracks repeatedly (around the edge of a windowpane, for example), apply a paintable caulk that is also water washable directly into the crack with your finger. Before it sets (usually within 30 minutes), wipe down with a clean damp cloth, again to smooth and to allow the existing texture to bleed through.
Matching Color and Texture When Filling Drywall Cracks
While matching the original color of your wall is difficult enough, if you have textured drywall surfacing, it’s going to be at least as difficult to match the drywall texture. If this is a concern, you might consider hiring a drywall contractor. The match may still not be exact, but it will probably be a whole lot closer to what you can produce. If you have several small home repair projects, you might also be saving yourself a bunch of time and headaches by hiring a handyman. A handyman may be able to patch your damaged drywall, look at your broken refrigerator, oil your garage door tracks, patch up your stained carpet, and whatever other small projects you have that needs to be done. If your walls are older and need new life, you might also consider hiring a professional home painter. Instead of trying to match your drywall patch to your old, worn wall surface, decorative painting and texturing can transform your room.
How To Drywall: A Finishing Shortcut
Most home improvement shortcuts lead to trouble. But here’s one that makes drywall finishing faster without regrets later:
In closets and other low-priority areas, don’t tape and mud inside corners. Instead, caulk them. I first tried this trick on wall and ceiling corners 20 years ago—and those corners still look good. There are just four things you need to know:
- When you hang the rock, keep gaps to a minimum. You can get away with 1/8-in. gaps, but not wider.
- Finish all the tapered joints and get a coat of primer on the rock before you caulk. Caulking directly over the absorbent paper facing leads to an ugly caulk job.
- Use a high-quality acrylic latex caulk. I once used dirt-cheap “painter’s caulk” and got cracks within a year.
- Don’t tell anyone. Critics will think you’re a lazy slouch. But if you don’t tell them, they’ll never notice.