Ideas for the Space Behind a Kitchen Corner Sink
Corner sinks allow you to use a larger expanse of your countertop for preparing meals, but they also create dead space. The area behind a corner sink is often ignored, but it is usable. Instead of letting that space fade into the background, use it to stow handy kitchen items or to add a dash of interest to your kitchen decor.
Add Storage
The space behind your corner sink might be open, or it may have cabinets over top. Either way, you can add floating shelves or a small cabinet in this space to add more storage instead of wasting the space. A small shelf unit can be used to hold cleaning supplies, such as dish soap, sink stoppers and sponges. Another option is to install hooks or a towel bar to the wall and use the space to store cups or dish cloths and towels.
Accessorize for Style
The space behind your sink is often small and the angle of the corner makes it difficult to display useful items. Not everything in your kitchen has to have a use, however. Use this space instead to add decorative elements, such as kitschy knickknacks, a row of cookbooks, funky or artsy plates on decorative stands, or canning jars filled with colorful flowers or stones.
Use Plants for Texture and Color
Corner sinks leave the right amount of space for small container plants. Plants add texture and color to any space, but in your kitchen, go for plants that you can use, such as spices or herbs. Look for plants that prefer humid conditions, so they’ll thrive in the moist area of your sink. For example, lemongrass (Cymbopogon citratus) is an easy-to-grow herb that thrives in moist, humid environments and will liven up your empty corner space as long as a nearby window provides lots of light. Chives (Allium schoenoprasum) also thrive in the moist environment of your kitchen.
Spice Racks or Canisters
While the space behind a corner sink isn’t usually large enough for many items, it’s ideal for a small spice rack or a row of small canisters. Choose interesting shapes or bold colors to add a dash of style to your kitchen, and store spices you use every day or canisters full of sugar, coffee or treats for your family. Another option is to fill decorative bottles with hand soap or dish soap and fill the space with these.
Home for Small Appliances
Most homeowners have several small appliances they use daily, such as toasters, juicers, hand-mixers and coffee makers. These items are handier when they’re out and ready to use, but they often take up valuable prep space on your countertop. Use the space behind the corner sink to stow these items instead. They’ll be out of the way, but still accessible, and they dress up the empty space.
What Kind of Glue to Hold a Sink in a Vanity?
Installing a vanity requires a strong glue to hold the sink to the countertop. More importantly, the glue needs to keep water out to protect the countertop from rot and swelling. This means a waterproof, watertight substance with bonding power is the choice professionals make and the best solution for installing your counter.
Silicone Sink Caulking
Silicone caulking seals sinks to the countertop and prevents water intrusion. Today, a special type of silicone caulking compound is manufactured specifically for sink installation. This sink caulking material has water repellent properties and it bonds to ceramic and countertop laminate. It is the most commonly used glue to install a sink. This product is also called bathroom or tub and shower caulking. Either one seals and protects your counter from water.
Granite Sinks
Mounting a vanity sink to a granite bathroom counter top requires another type of glue, one that bonds to granite and the sink surface. Advanced adhesives specifically for granite counter tops are the choice here. Silicone caulking is still used on rimmed sink installations to seal out water. It acts as a protective barrier. The main focus in a rimmed vanity sink installation on granite is keeping water from dripping onto the cabinet below, anyway. Since granite is solid rock, water intruding into the counter is not an issue. The mounting clips secure the sink to the counter.
Undermount Sinks
An undermount vanity sink requires a very special adhesive. It must seal and bond very well while supporting the weight of the full sink. It is very important to seal the sink properly to the counter top, because if the supports weaken and the sink separates from the counter, water will leak into your cabinets. It also jeopardizes the stability of the sink and if it drops this has potentially disastrous effects on the plumbing beneath it. For this reason, only use manufacturer-recommended undermount sink adhesives and sealants designed for your counter surface and sink material, on any installation. Anything else is not strong enough for this type of project.
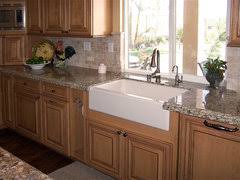
Farmhouse Fabulous: All About Apron Sinks
All this is fine, and helps to give these sinks their unique look. But it also means that if, for whatever reason, you tire of your farmhouse sink, you can only ever replace it with another farmhouse-style sink, unless you want to buy a new countertop entirely, which is a pretty expensive proposition.
Apron front sinks also require a unique kind of sink cabinet. If you take a look at your average sink cabinet, you’ll notice that it has doors below, and above the doors, in front of the sink, what looks like a drawer (to blend in with the rest of the kitchen cabinets) but isn’t. In order to accommodate a farmhouse sink, you’ll either need to buy a sink cabinet that is designed specifically for one, or have your contractor (or yourself) cut through that fake drawer bit at the top to accommodate the apron front. It’s not a big loss in terms of storage, but it does mean that your sink cabinet is now unsuitable for any other kind of sink.
It Will Get Stained (And Potentially Chipped)
If you opt for a classic white porcelain farmhouse sink, it’s very likely to get stained, and it will require regular cleaning to keep it sparkling. Scrubbing the sink with baking soda will help remove sauce stains, yet this mild abrasive won’t scratch the surface. If you don’t want to commit to cleaning your sink often, you may want to consider getting a farmhouse-style sink in another material besides porcelain, such as stainless steel.
If you cook often with cast iron pans or other heavy cookware, there’s also a chance you could chip a porcelain sink. Being careful when washing the dishes and investing in a protective sink mat will help avoid chips.
How to Troubleshoot Low Hot Water Pressure on a Single Handle Kitchen Faucet
An insufficient flow of water is usually the result of a blockage, and to remove it, you first have to locate it. A common cause of blockages in kitchen faucets is a build-up of mineral deposits, which can collect in the supply hose, the shutoff valve under the sink or the faucet valve. Single-handle faucets can have either a cartridge or ball valve, and both types of valves have ports that can get blocked. A good strategy for diagnosing low hot water flow is to begin looking for problems at the water heater and work toward the faucet valve.
Make sure that the hot water outlet valve on the water heater is open all the way by turning it counterclockwise as far as it will go. Check the hot water flow in other faucets in the house. If they also have low flow, and the water heater valve is open, there may be a restriction in the pipes near the water heater. This is more likely if the pipes are galvanized steel and old. The solution is to replace the pipes.
Open the shutoff valve under the sink all the way, and see if that makes a difference to the faucet flow. If the valve is already open, turn it off and disconnect the faucet supply hose from the faucet with adjustable pliers. Point the hose into the bucket and turn on the valve. If the flow is less than you expect, you probably need to replace the valve or the hose.
Service the faucet if you can’t find any other reason for the low flow. Start by turning off both shutoff valves under the sink and opening the faucet to relieve water pressure.
Remove the faucet handle with a Phillips screwdriver or Allen wrench, depending on how it is attached, and take out the valve. If it’s a cartridge faucet, you may have to pull a pin with needle-nose pliers or unscrew a retaining nut with adjustable pliers to get the valve out. If it’s a ball-valve faucet, unscrew the collar holding the valve with adjustable pilers, and carefully lift the valve off.
Insert a length of bare 12-gauge electrical wire into the hot water inlet port in the valve seat to dislodge any deposits that may have accumulated there. Flush the inlet by turning on the hot water shutoff valve for a few seconds.
Inspect the valve. If you see mineral deposits around the base, you may be able to chip them off with a flathead screwdriver. If not, try dissolving them by soaking the valve overnight in white vinegar. Replace the valve if you can’t clean it.
Reassemble the faucet after cleaning the valve seat and cleaning or replacing the valve. Turn on the shutoff valves, and flush air and loose debris out of the lines by leaving the faucet open for about 30 seconds.