Learning the Basics of Toilet Installation
Remove the Lid and Drain the Tank
Shut off the water supply to the toilet by firmly closing the supply valve. Remove the tank lid, and flush the toilet, holding the lever down to let as much water drain from the tank as possible. Use a sponge to soak up the excess water in the tank and a plunger to force as much water as possible out of the bowl.
Remove the Caps and Nuts
Pop the caps from the base of the bowl. Remove the nuts with an open-ended wrench. You may need to hold the bolt still with a pair of needle-nose pliers. If the nut is rusted to the bolt, you may have to break it off.
Remove the Toilet
Disconnect the toilet supply tube from the toilet stop. Shift the toilet back and forth while lifting it off the flange. If you’re working alone, remove the tank by unbolting it from the bowl before you attempt lifting the toilet from the flange.
To prevent sewer gases from entering your bathroom, stuff a rag into the drain opening. Scrape all the old wax from the flange, and check for cracks. If the flange is cracked, replace it. Be sure to wear gloves when scraping off the old wax.
Install New Bolts and Wax Seal
Place the new toilet bolts in the flange with the bolts pointing up. Remove the rag from the toilet drain, and place a wax seal on the flange. Squeeze enough wax onto the bolts to hold them upright. Use a deep-seat wax seal when replacing older water toilets.
Attach the Tank to the Bowl
Set the tank seal in place. Place the tank on the bowl. Drop the tank bolts through the appropriate holes. Tighten the bolts until the tank doesn’t wobble. Be sure not to over tighten the bolts: you could crack the porcelain. If you’re working alone, attach the bowl to the floor before installing the tank.
Install the New Water Closet
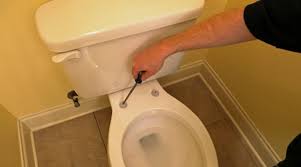
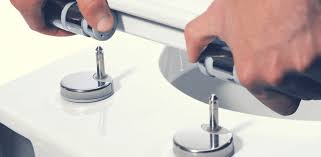
Slowly set the tank and bowl assembly onto the wax seal, lining up the bolts with the mounting holes in the bowl. Tighten the nuts onto the bowl until the assembly doesn’t wobble. Reconnect the toilet supply tube to the tank. Refill the tank, adjust the water level, and check for leaks. Attach the seat using the seat bolts provided.
How Often Should I Replace My Plumbing Fixtures?
Toilets (like the actual toilet bowls themselves) really only need to be replaced if they’re cracked, though different parts within the toilet may need replaced more frequently. For example:
- Handle: there is no distinct time frame, but you should replace your toilet handle if:
- You have to jiggle it to stop the water from running
- Your toilet won’t fully flush unless you hold the handle down
- Your water runs on its own without you having flushed
- Flappers, trip levers, fill valves, fittings, and plumbing connections: 4-5 years
- Wax seals: 20-30 years
Toilets should be caulked at the floor
As standard procedure for every home inspection that I perform, I check the toilets to make sure they’re properly anchored to the floor. Almost every time I find a toilet that’s loose, I also find missing caulk at the base of the toilet. The two go hand-in-hand.
When I find a loose toilet I tell my client to properly secure the toilet to the floor and to caulk around the base of the toilet, but I frequently get clients that tell me they’ve heard otherwise.
The thought process behind not caulking a toilet to the floor is that if the toilet leaks at the floor, you’ll quickly find out about the leak as long as the toilet isn’t caulked. If it is caulked, the thinking is that if the toilet flange leaks, you’ll end up trapping water between the toilet base and the floor in an area that you can’t access.
In reality, toilets rarely leak onto the floor. More often, they leak through the floor around the flange. I’ve found plenty of toilets that leak down into the basement, but very few that leak onto the bathroom floor.
If the Toilet Won’t Stop Rockin’
If tightening the flange bolts or shimming the toilet base doesn’t stop your toilet from rocking, there might be more significant problems down below. The flange bolts that secure the toilet base are themselves held by a metal or plastic ring at the top of the toilet flange. The ring can corrode or break, loosening its grip on the bolts.
If your rocking comes back after a while, or if the bolts loosen up and won’t retighten, a damaged flange is likely the cause. The solution is to remove the toilet and either replace the old flange or repair it with a flange repair kit.
Top Toilet Tip:
Instead of standing by feeling helpless as a clogged toilet threatens to overflow, take action: Quickly remove the tank lid, reach into the tank and close the flapper—the round, rubber trap door that seals over the big hole in the bottom center of the tank. This will stop the flow of water into the bowl. Alternatively, you can close the shut-off valve to the water supply line. It’s on the wall behind the toilet, near the handle side and several inches above the floor. It has a football-shaped handle that you want to turn to the right, just like a faucet. Be warned, however: Old valves can be stuck and corroded, and turning them may cause some leakage.